


To read an NYC DOT sidewalk violation notice, start with the violation number, then study the Preliminary Inspection Report (PIR) attached to it. That one-page diagram shows exactly which sidewalk squares the city wants replaced, why, and roughly how many square feet that adds up to. Match it to your property, decode the numbers written inside each square, and note your 75-day deadline. Everything else in the packet supports those three steps.
The PIR might look confusing to you. Don't worry, many property owners feel the same way. We'll explain it step by step in simple terms.
Don't let one overlooked detail turn your sidewalk violation into a costly headache!
Let FY Sidewalk inspect your sidewalk for free and handle DOT violations, permits, and repairs from start to finish.
The Parts of the Notice Worth Your Time
An NYC Department of Transportation (DOT) sidewalk violation notice comes with specific legal documents and blueprints that property owners must review immediately:
- Notice of Violation (NOV): The official legal warning stating that your sidewalk failed a physical inspection. It includes a unique 4- to 6-digit violation number, your property's Block and Lot number, and a repair deadline (typically 75 days for standard defects, or 10 days if flagged as an immediate hazard).
- Preliminary Inspection Report (PIR): A diagram and breakdown of your property's frontage with numbered concrete "flags" (squares). It details the exact defects found, such as trip hazards (1/2 inch or greater elevation difference), full-depth cracks, missing slabs, or improper drainage.
- Cost Estimate / Letter: The package includes a letter and cost figures showing the estimated price per square foot (broken down by 4-inch concrete or 7-inch concrete for driveways). You multiply the estimated square footage on the Preliminary Report by the cost per square foot listed on that letter to find the estimated City repair cost.
Start With the Basics: Number, Address, and Dates
Before you decode anything, confirm the notice is really about your sidewalk.
Every violation has a number with four to six digits, such as 1432 or 31221. Keep it handy because the city asks for it every time you request a copy, file a dispute, or schedule a removal inspection.
Next, check the property details against what you know. Borough, block, and lot should match your tax records, and the property dimensions should make sense. Mistakes do happen sometimes, because DOT relied on outdated ownership records. If anything looks off, call 311 and ask for a "Sidewalk Violation Search."
Read the Preliminary Inspection Report, Step by Step
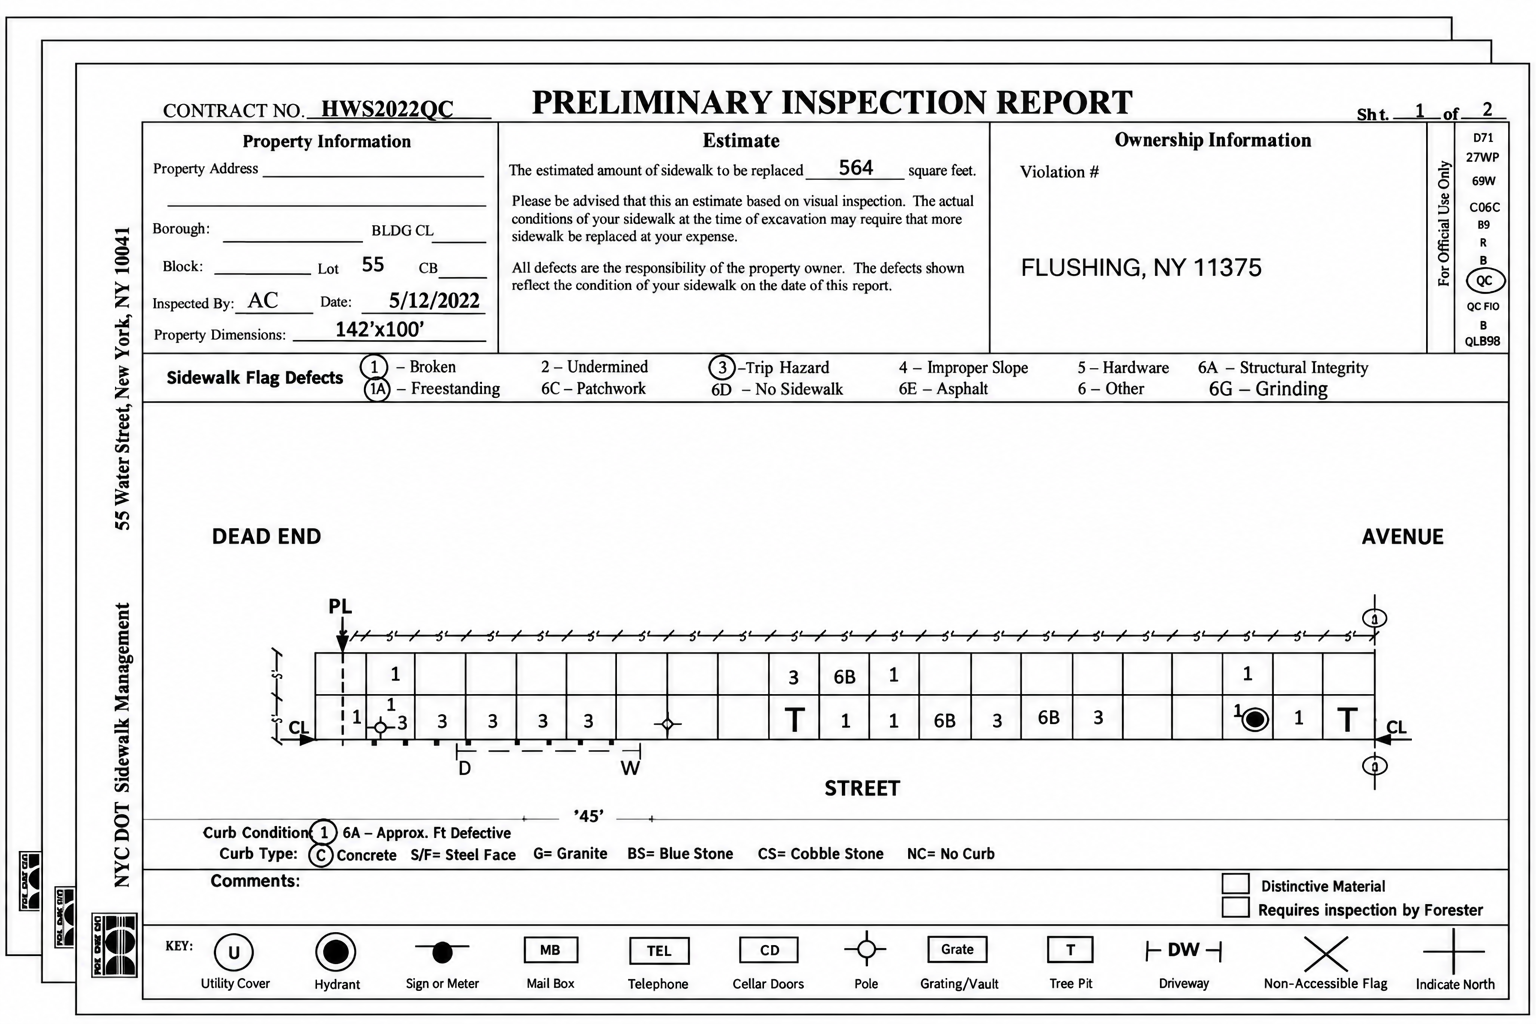
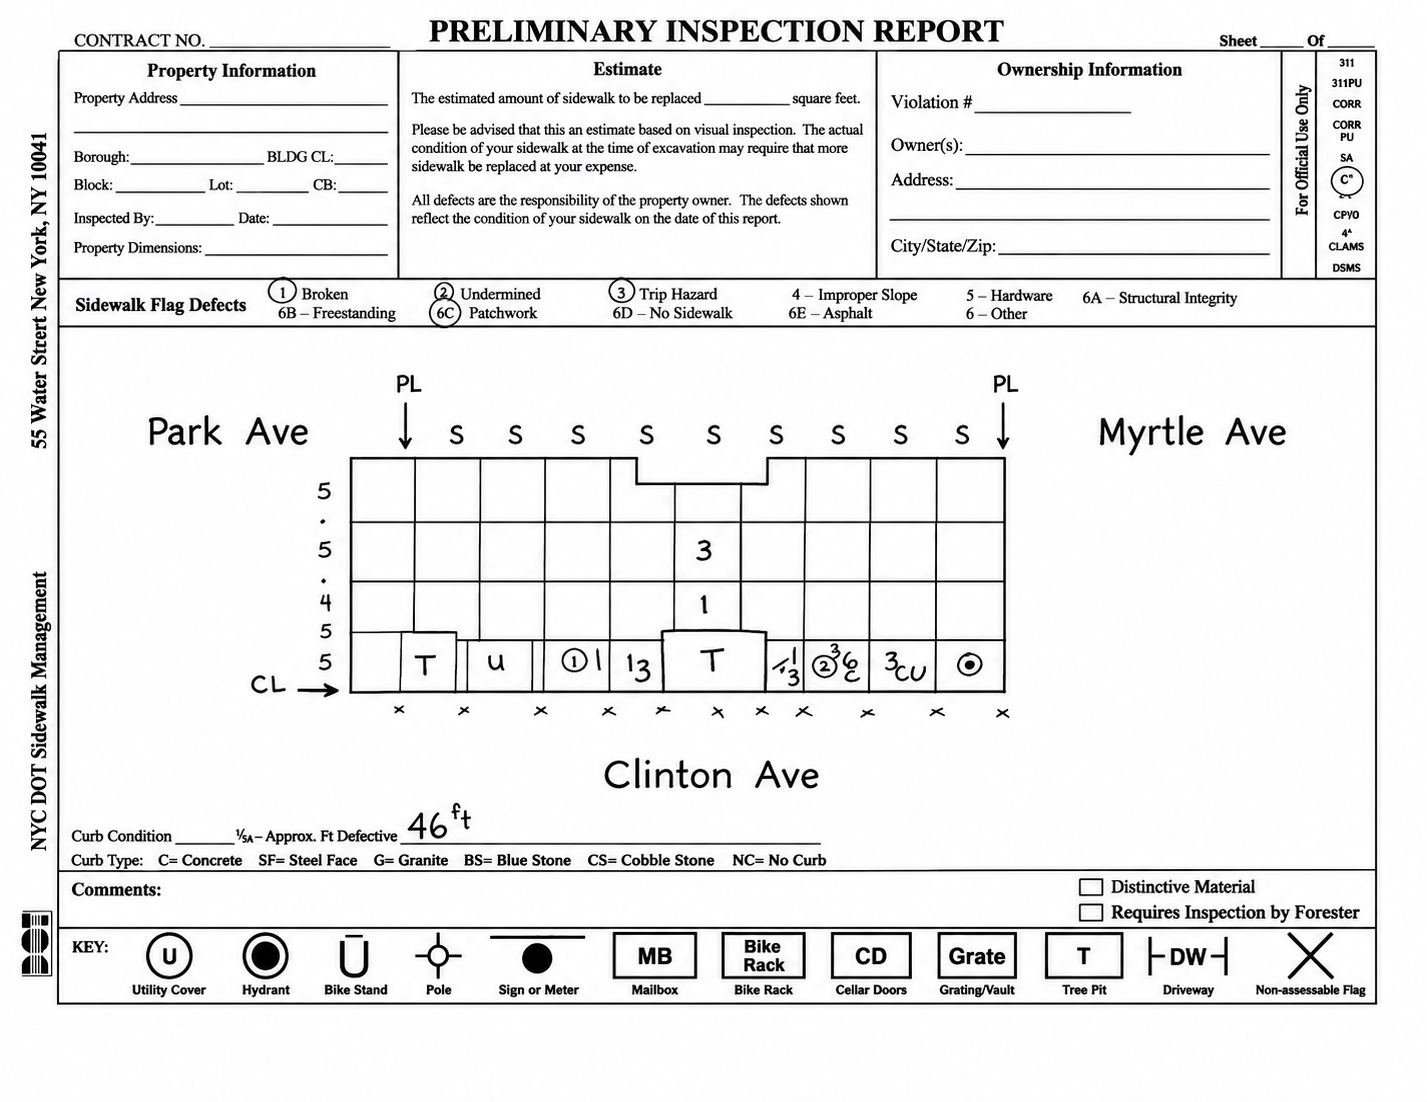
Now for the page that causes the most confusion. The PIR is a hand-marked sketch of your sidewalk, and once you know the legend, it reads like a simple map. Grab your copy and follow along. I'll use two sample reports as examples. One is a Queens property with an estimate of 564 square feet, and the other is a Brooklyn corner-style layout with an estimate of 133 square feet.
Step 1: Read the Three Header Boxes
The top of the form holds three boxes.
Property Information: It lists the address, borough, block, lot, and property dimensions (the Queens sample shows 142' x 100'). It also records the inspection date and the inspector's initials. This is your first accuracy check.
Estimate: It gives the amount of sidewalk to be replaced, in square feet. The form is upfront that this is a visual estimate and that the real work may uncover more damage. That's worth remembering, because the number on paper is a starting point, not a guarantee.
Ownership Information: It holds your violation number and owner details.
You'll also see a narrow column on the far right labeled "For Official Use Only," with circled codes. Those are internal routing marks, and you can ignore them.
Step 2: Learn the Defect Codes
Directly beneath the header sits a strip called Sidewalk Flag Defects. This is your decoder ring. A "flag" is simply one square of concrete, and inspectors use these codes to label what's wrong with each one.
- 1 - Broken: Sidewalk concrete is cracked, broken, or damaged.
- 2 - Undermined: The concrete slab has lost support underneath, causing it to sink, settle, or become unstable.
- 3 - Trip Hazard: Uneven or raised sidewalk slabs create a tripping hazard for pedestrians.
- 4 - Improper Slope: The sidewalk has an incorrect slope or uneven grade that does not meet NYC DOT requirements.
- 5 - Hardware: Metal hardware, such as utility covers, grates, or other fixtures, is damaged, loose, or improperly installed.
- 6 - Other: Sidewalk defects that do not fall under the other specific violation categories.
- 6A - Structural Integrity: The sidewalk lacks proper structural strength or stability.
- 6B - Freestanding: A sidewalk section or concrete element is detached or freestanding rather than properly secured.
- 6C - Patchwork: The sidewalk contains improper, deteriorated, or uneven patches that do not meet DOT standards.
- 6D - No Sidewalk: There is no sidewalk where one is required.
- 6E - Asphalt: Asphalt has been used instead of the required concrete sidewalk material.
One of the samples also lists 6G for grinding. Forms vary a little from one report to the next, so always rely on the legend printed on your own copy.
Note. Inspectors circle the codes they used on your property. The Queens sample circles 1, 3, and 6B, so you already know the problems involve broken flags, trip hazards, and freestanding flags. The Brooklyn sample circles 1, 3, and 6C, which points to broken flags, trip hazards, and patchwork. You get a summary before you even look at the drawing.
Step 3: Orient Yourself on the Sketch
Every diagram is labeled with street names so you can tell which direction you're looking. The Queens sample marks a dead end on one side and an avenue on the other, while the Brooklyn sample names three streets around the block.
Two abbreviations matter most:
- PL is the property line, where your sidewalk responsibility begins and ends.
- CL is the curb line, the edge closest to the street.
The small numbers along the edges, mostly 5s with an occasional 4, are flag dimensions in feet. Inspectors multiply these out to build the square footage estimate. If the widths and lengths don't resemble your actual frontage, something may be wrong.
Step 4: Read the Boxes Flag by Flag
Each box on the sketch is one concrete flag, and whatever is written inside it is a defect.
- A lone 1 means that flag is broken.
- A 3 means a trip hazard.
- A pair like 1/3 or 3/6C means the same flag has more than one problem.
- 6B marks a freestanding flag.
Blank boxes are considered acceptable. DOT's guide is clear that every flag marked with a number must be replaced, and any defects must be corrected. The 6B flags deserve a note of their own. Freestanding flags are ones that come loose because the neighbors next to them have to be removed, so DOT recommends replacing them too.
Step 5: Decode the Symbols
Along the bottom of the form, a key shows what each drawn symbol represents. A few show up again and again:
- T is a tree pit.
- U in a circle is a utility cover.
- A filled circle in a ring is a hydrant.
- A circle with crosshairs is a pole.
- MB, CD, and Grate stand for mailbox, cellar doors, and grating or vault.
- DW with brackets marks a driveway.
These matter more than they seem. Fixtures and tree pits often sit right in the middle of the damaged area, and they can raise questions about who is actually responsible for a given flag.
The key also includes an X, which stands for a non-assessable flag. And that flag may qualify for a free replacement if the city does the work. Both samples show small X marks along the bottom edge, but exactly which flags they relate to isn't obvious from a scan. Before you accept the estimate as is, ask 311 which flags, if any, count as non-assessable on your property.
It's worth addressing the defects within the given timeline to avoid delays and additional charges if the city steps in to complete the repairs. The city's estimate represents what it will charge you for handling the work itself. Hiring a private contractor may be a more affordable option. You can have the violations corrected and potentially get them dismissed at a reasonable cost without waiting for the city to carry out the repairs.
Step 6: Check the Curb Section
Below the sketch you'll find a curb section with a condition code, a line for approximate feet of defective curb, and a curb type. The samples show about 45 and 46 feet, with "C" for concrete. Other options include granite, steel face, bluestone, and cobblestone.
Good news here. The city may repair or replace missing and defective curbs at no cost to the owner when working on a sidewalk violation. However, NYC DOT encourages property owners to include curb repairs in their sidewalk repair project rather than leave broken or missing curbs unaddressed.
Step 7: Look at the Checkboxes and Comments
Near the bottom right are two boxes, "Distinctive Material" and "Requires Inspection by Forester." Both are blank on the samples. If either is checked, the situation changes.
A distinctive sidewalk, made of granite, slate, brick, or another non-concrete material, has special rules and approvals. A forester check signals that tree roots may be involved. The Comments line is worth a glance too, since inspectors sometimes add a note there.
Go Through The Cost Letter
A letter usually arrives with the notice. It lists the city's cost per square foot, and that's how you can estimate what the city would charge if it did the work. Multiply the square footage on the PIR by the per-square-foot rate. Use the 7-inch concrete rate for driveway areas and the 4-inch rate for everything else.
Treat the result as a ballpark. As the PIR itself warns, the final bill can climb if the crew finds more damage once the old concrete comes out.
Your Options After Reading the Notice
Once you understand the notice and the repairs required, you have several options for addressing the violation. The right approach depends on the condition of your sidewalk and whether you agree with the inspector's findings.
Repair It Yourself
Hire a contractor licensed by the Department of Consumer and Worker Protection, and make sure they pull the sidewalk construction permit.
Once the work is done, request a dismissal inspection. Keep the following information handy when submitting your request:
- The permit number
- The property address
- Block and lot numbers
- The violation number
- Your contact information
The violation comes off once a DOT inspector confirms the work meets specifications.
Dispute It
If the marked defects don't match what's on your sidewalk, you can ask for a re-inspection within 75 days of receiving the notice. Call 311 and ask for "Dispute New Sidewalk Violation - Re-Inspection Request." A different inspector, one who hasn't seen the PIR, handles it. The result is final and arrives by mail. DOT inspectors don't come knocking on your door, so you'll be notified by mail ahead of the visit.
Conclusion
A sidewalk violation notice looks intimidating at first glance, but it's really just a to-do list written in the city's shorthand. Once you know how to read it, the whole packet starts to make sense.
The most important thing to remember is the clock. You have 75 days from the day you receive the notice, and a permit won't buy you extra time. There's no fine attached, but ignoring the notice can lead to the city doing the work and billing you, plus a lien on your property that can slow down a sale or refinance.
Before you spend a dollar, walk your sidewalk with the PIR in hand and check that the address, dimensions, and marked defects are accurate. If something is off, request a reinspection within the 75 days. If everything checks out, hire a licensed contractor, get the permit, and schedule the dismissal inspection. Once DOT signs off, the violation comes off your record.